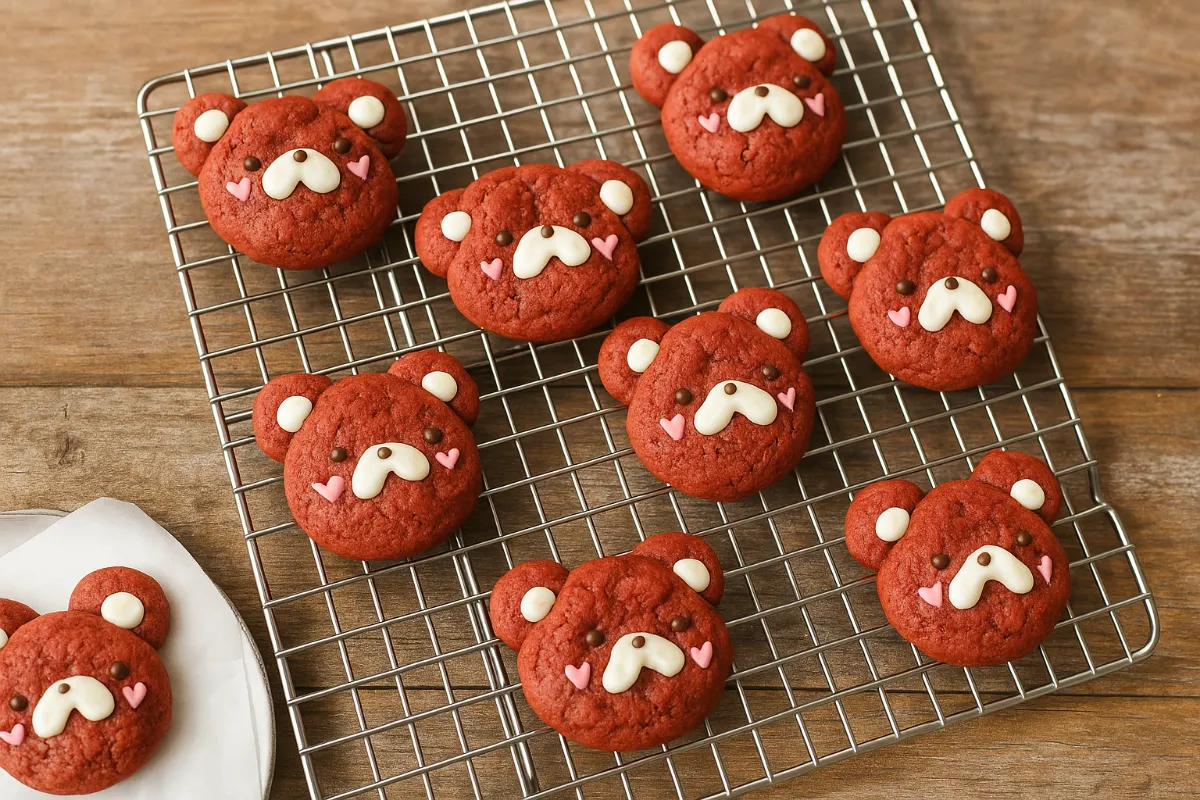
Red velvet bear cookies were born one snowy afternoon in Asheville when I pulled out a long-forgotten teddy bear cookie cutter from my kitchen drawer. I had some leftover red velvet dough from another recipe, and something about that little bear shape sparked a memory from childhood. Back in small-town Indiana, cookie days were a big deal, especially around holidays. My grandmother would make sugar cookies shaped like bells and trees, but I always wished for more playful shapes—like bears.
So I rolled out the dough, pressed in the cutter, and baked a batch of soft, crimson teddy bears. I added chocolate chips for tiny noses and dotted their paws with mini white chocolate buttons. And just like that, red velvet bear cookies became my new favorite thing.
They’re not just cute. They’re incredibly delicious—soft and chewy in the center, with that rich cocoa-kissed flavor and signature deep red color. They make people smile before they even take a bite. And when they do? It’s the kind of cookie that gets remembered. If you love cookies that combine charm and flavor, don’t miss these Berry Lemon Cheesecake Cookie Cups—a fruity favorite that’s as pretty as it is tasty.
Red velvet bear cookies are perfect for gifting, especially around Valentine’s Day, baby showers, or birthdays. They look like they came from a boutique bakery but come together with simple pantry staples and a little creativity. And kids love them—not just to eat, but to help make and decorate.
What I love most is that these cookies are an invitation to play. You can give each bear a personality, add icing scarves, or press heart candies into their chests. They’re cookies that invite joy from the moment you mix the dough to the last crumb on the plate.
So if you’re ready for a recipe that’s equal parts charming and craveable, red velvet bear cookies are your next bake. Let’s get started.
Print
Red Velvet Bear Cookies and the Joy of Whimsical Baking
Red velvet bear cookies are soft, chewy, and shaped like adorable teddy bears. With a rich cocoa-vanilla flavor and bright red color, they’re perfect for gifting, holidays, or baking with kids.
- Total Time: 30 minutes (plus chilling)
- Yield: 20–24 cookies 1x
Ingredients
1/2 cup unsalted butter, softened
1/2 cup brown sugar
1/4 cup granulated sugar
1 egg
1 tsp vanilla extract
1 tbsp red gel food coloring
1 tbsp cocoa powder
1 1/2 cups all-purpose flour
1/2 tsp baking soda
1/4 tsp salt
Optional: chocolate chips, candy eyes, icing for decoration
Instructions
1. Cream the softened butter with both sugars until smooth.
2. Add egg, vanilla, and red food coloring. Mix until well combined.
3. Sift in cocoa powder, flour, baking soda, and salt. Mix just until a soft dough forms.
4. Chill the dough for 30 minutes.
5. Preheat oven to 350°F and line a baking sheet with parchment.
6. Roll out dough to 1/4-inch thickness. Cut bear shapes with cookie cutter.
7. Add chocolate chip noses, candy eyes, or decorations as desired.
8. Place bears on baking tray and chill again for 15 minutes.
9. Bake for 8–10 minutes or until just set. Let cool before moving.
10. Decorate or serve as is.
Notes
For best shape, chill the cut-out cookies before baking.
Use gel coloring for vibrant red without adding too much liquid.
Store in an airtight container up to 4 days.
Freeze shaped, unbaked bears up to 2 months.
- Prep Time: 20 minutes
- Cook Time: 10 minutes
- Category: Cookies
- Method: Baking
- Cuisine: American
- Diet: Vegetarian
Nutrition
- Serving Size: 1 cookie
- Calories: 140
- Sugar: 10g
- Sodium: 75mg
- Fat: 7g
- Saturated Fat: 4g
- Unsaturated Fat: 2g
- Trans Fat: 0g
- Carbohydrates: 18g
- Fiber: 0.5g
- Protein: 1.5g
- Cholesterol: 20mg
Keywords: red velvet bear cookies, teddy bear cookies, holiday cookies
Table of Contents
How to Make Red Velvet Bear Cookies at Home
Making red velvet bear cookies is easier than it looks—and way more fun. All you need is a soft, colorful dough that holds its shape well, a bear-shaped cookie cutter, and a little imagination. These cookies aren’t just for kids, either. They’re crowd-pleasers at baby showers, holidays, and birthday parties, and they always get a “Wow!” before anyone takes a bite.
Red Velvet Cookie Ingredients That Bring Color and Flavor
The base dough for red velvet bear cookies is similar to traditional red velvet cake, but with less moisture and more structure so the bears don’t spread or lose their shape. Here’s what makes it work:
- Unsalted butter – Softened, not melted, to create a stable, creamy texture.
- Brown sugar and white sugar – This mix keeps cookies soft and slightly chewy.
- Egg – Helps bind the dough and hold shape.
- Vanilla extract – Adds warmth and depth.
- Cocoa powder – Use Dutch-process or natural cocoa for that red velvet edge.
- Red food coloring – Gel works best to keep the dough vivid.
- All-purpose flour – Provides structure for clean edges.
- Baking soda and a pinch of salt – Gives lift and flavor balance.
- Optional: white chocolate chips, mini M&Ms, or heart candies for decoration

The trick is to use just enough cocoa for flavor but not so much that the red turns brown. A bit of cornstarch or chilling the dough can help the cookies hold detailed bear features like paws and ears.
Rolling, Cutting, and Shaping the Bear Details
Once your dough is ready, divide it in half and chill it for at least 30 minutes. Cold dough cuts cleaner and helps bears hold their shape while baking.
Roll it out between two sheets of parchment to about 1/4-inch thick. Use your bear cutter to press firmly—wiggle just a bit to release the shape cleanly. Place bears on a parchment-lined baking tray, spaced an inch apart.
If you want to decorate before baking, press in chocolate chip “noses,” tiny candy buttons, or edible eyes. For more defined features, lightly score the dough with a toothpick where paws or tummies should be.
Bake at 350°F for 8–10 minutes—just until the edges set. Let them cool on the pan for 5 minutes before transferring. Once cool, you can decorate with icing or leave them perfectly simple. Either way, red velvet bear cookies are guaranteed to bring smiles.
Red Velvet Bear Cookies – What Can Go Wrong and How to Fix It
Even the cutest cookie can go sideways in the oven. If you’ve ever pulled out cookies that look more like red blobs than bears—or worse, brown and dry—this section’s for you. With a few easy tweaks, your red velvet bear cookies will turn out picture-perfect every time.
How to Keep Red Velvet Cookies from Turning Brown
Red velvet gets its signature color from a blend of red food dye and cocoa powder. But when the oven’s too hot or the cocoa ratio’s off, the cookies can bake into a dull brown instead of that vibrant red.
Here’s how to fix it:
- Use gel food coloring instead of liquid. It’s more concentrated, so you need less.
- Don’t overmix the dough after adding the coloring—it can dull the color.
- Chill the dough before baking to slow browning and keep definition.
- Lower your oven temp slightly, around 325–340°F, especially if you have a dark metal pan.
- Use parchment paper instead of greasing the tray, which can cause excess browning on the bottoms.
You want your red velvet bear cookies to look as good as they taste—and yes, the deep red hue is part of the charm.
How to Stop Cookies from Losing Their Bear Shape
You worked hard on those little paws and ears—don’t let them spread into puddles. Shape-holding is all about temperature, dough thickness, and the right cutter.
Try this:
- Chill the shaped cookies on the tray for 15–20 minutes before baking.
- Roll your dough evenly—thinner cookies crisp too fast, thicker ones puff and spread.
- Flour your cutter between presses to prevent sticking and stretching.
- Use a cutter with strong edge definition and avoid over-softening your butter.
Cookies that hold their shape make decorating easier and give your bears personality. And once you get it right, red velvet bear cookies turn from “cute idea” to “instant favorite.”
Red Velvet Bear Cookies That Look Great and Taste Even Better
Once you’ve baked your red velvet bear cookies, the next step is almost as fun—styling them, storing them, and sharing the sweet results. Whether you’re making them for a party, a holiday, or just because they’re cute, how you present these little bears makes all the difference.
Cookie Box Ideas, Party Favors, and Gift Wrapping
These cookies are the definition of “made with love.” Their color, shape, and softness make them perfect for celebrations or thoughtful little gifts. You can pack them in clear cellophane bags tied with red or pastel ribbons, or stack them in kraft paper boxes with a parchment liner.
Here are some ideas:
- Holiday trays: Add red velvet bear cookies alongside snowflake sugar cookies and white chocolate bark.
- Baby showers: Wrap a few in a soft-pink bag and tie with a baby-blue ribbon for a playful reveal.
- Valentine’s gifts: Pop a mini heart candy on each bear’s belly, and place a tag that says “You’re beary sweet.”
- Party favors: Use small jars or clear boxes and let kids decorate their own cookies with edible markers.
A drizzle of melted white chocolate, powdered sugar dusting, or even a swirl of confetti yogurt frosting can give these bears an extra boutique-bakery look.
Storing and Freezing Tips for Freshness and Texture
To keep your red velvet bear cookies soft and full of flavor:
- Store cooled cookies in an airtight container at room temperature for 3–4 days.
- If stacking, place parchment or wax paper between layers to protect detail.
- For longer storage, freeze the shaped, unbaked cookies on a tray, then transfer to a freezer bag. They’ll last up to 2 months.
- When ready to bake, don’t thaw—just bake straight from frozen and add 1–2 extra minutes.
Avoid refrigerating baked cookies, as it tends to dry them out. The best flavor shines on the day after baking—perfect for prepping ahead of a party or gift day.
No matter how you dress them up, red velvet bear cookies bring joy with every bite—and every smile they get along the way.
Red Velvet Bear Cookies – FAQs Answered
How do I make red velvet cookies hold their shape?
To help red velvet bear cookies keep their shape, chill the dough before cutting and again after shaping. Use a firm dough, roll evenly, and bake at a lower temperature like 340°F. Avoid over-softening the butter, and don’t skip chilling—it’s key for crisp bear details.
Why do my red velvet cookies turn brown after baking?
Red velvet bear cookies may brown if your oven is too hot, your cocoa content is high, or your food coloring isn’t concentrated enough. Use gel coloring, chill the dough, and bake on parchment to avoid over-browning the bottoms and preserve that signature red color.
Can I use natural food coloring for red velvet cookies?
Yes! You can use beet powder, pomegranate juice, or even red radish extract to color red velvet bear cookies. Keep in mind natural colors are more subtle and may bake slightly brown, so reduce cocoa and bake gently to preserve the hue.
What makes red velvet cookies different from chocolate cookies?
Red velvet bear cookies use less cocoa and include added acidity from buttermilk or vinegar, which gives them a tangy flavor and softer crumb. They’re milder than chocolate cookies and often colored red, giving them a unique look and nostalgic taste.

Red Velvet Bear Cookies Are Almost Too Cute to Eat (Almost)
There’s something magical about cookies that make people smile before they even take a bite. Red velvet bear cookies do just that. They’re soft, rich, and loaded with charm—from their deep red color to their adorable little faces. And best of all, they’re easy to make at home with just a few simple tools and a little dough-chilling patience.
These cookies bring out the playful side of baking. They’re perfect for holidays, baby showers, birthdays—or just a cozy weekend in. Whether you gift them in a box or let the kids decorate their own batch, they always steal the show.
I hope you’ll give this recipe a try, make it your own, and share it with people you love. If you do, I’d love to see your sweet creations. Tag me on Facebook or share your cookie cuteness on Pinterest. Trust me—once you bake a tray of red velvet bear cookies, they won’t last long.
So roll up your sleeves, press out those bears, and let your inner child (or your actual child!) have some fun. Baking doesn’t have to be serious—it just has to be sweet. And if you’re craving even more playful bakes, check out the adorably simple Lazy Cat Cake—another cozy weekend treat that’s big on charm.


3 thoughts on “Red Velvet Bear Cookies and the Joy of Whimsical Baking”